This song is not for the faint hearted. It is up there with every other guitar classic, if you already play in a band or soon will, it is one of the more requested songs. Many people play this song and just jam it rather than learn it note for note, I am guilty of being one of them. I first learnt it as a fill in song, one where the rest of the guys in the band said "we should learn Sweet Home" and from there no one really put much effort into learning it because it's only 3 chords and a jamming solo around the scale of "E Blues"... How hard could it be?
I'ts only been the last few years when I've really started teaching the song to students that I've realised this is a difficult song to play verbatim, jamming it's easy. Spend the time now and learn it note for note, there is a lot of riffs here that are standard and a few more that go against the grain of most players (fingers go next where they don't normally go).
I have split the parts into three main guitar parts (3 electrics - guitar 1, guitar 2 & lead), there is also an acoustic in there as well but it doesn't play a vital roll, so once you get a feel for the song you'll be able to work out the feel for the acoustic.
Amplifier Settings
Every amp is different, so this is a rough setting. What you want from your amp is a nice rich top end with a even amount of bass added. The sound is only slightly distorted so make your gain just a little higher than the volume (the more the gain over rides the volume the more it distorts). Some amps or effect pedals have level switches, Lo Gain, Mid Gain & High Gain.

Intro
Listen to the following parts combined.
Guitar 1 - Intro
Learn these 3 shapes first, D, Cadd9 (C9) and G are the 3 main chords that make up this song. There is a F Major (Bar Chord) placed twice elsewhere in the song but we'll get to that later.
-
D

-
C9
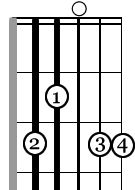
-
G

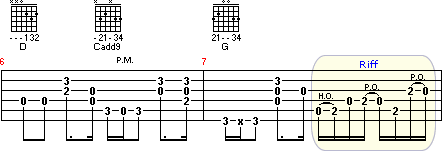
The TAB below is based around the above 3 chord shapes then a riff on the end (highlighted). Practice both parts separately over and over then try to put them together. When I teach this song to anybody they always have trouble getting the riffs up to speed. Remember to start slow and work your way up in speed. Don't try to play them fast first up unless your a little experienced as you may learn them wrong and interpret the riffs with your own personal shortcuts.


From bar 6 the rest of the band comes in..


Guitar 2 - Intro
Listen to the audio tutor to get the timing for this riff. Start it with your 1st finger 7th fret.

This rhythm is similar to the verse rhythm pattern. As you can see the first riff (bar 7) is doubling up with guitar 1 above. The second riff in bar 9 is played as a piano line in the song but you can use the natural harmonics if you don't have a piano player in your band. I just put it in because it sounds good!

Guitar 3


Verses
Listen to the following parts combined.
Guitar 1
Once you get use to the feel of the intro the verse rhythms are virtually the same. Again, these guitar parts are split into chords then a riff as shown highlighted below.


Guitar 2
The second guitar in the verse is not a difficult part to play although you do have to listen to the audio demo a few time to get the timing right. I would suggest playing the D note (2nd string 3rd fret) with your 3rd finger then the G note (1st string 3rd fret) with your little finger as if you were playing the top end of a G Major chord. This way in bar 7 when you slide up to the 5th fret you can place your 1st finger on the 3rd fret 1st string (G note)
Verse Pre-Chorus (Guitar 1)
The only difference in this part is the end riff (highlighted in yellow) is new all the rest stays the same.


Verse Variation
Guitar 1
Listen to the following parts combined.
This variation only happens once in the song in the 3rd verse.
Song Text (verse 3)
In Birmingham they love the gov' nor (Boo ooh ooh)
Now we all did what we could do...
The (boo ooh ooh) is F C D as shown below (boo=F ooh=C ooh=D). The D chord is the start of the next bar.

Guitar 2
Start this riff (yellow highlight) with your 1st finger on the 4th string 5th fret. It's a bit difficult to get the 1st finger from the 3rd note in the riff (3rd string 5th fret) up to the next (5th string 5th fret) but it's not a major riff in the song like the others are so you don't really hear it too much.

Chorus
Listen to the following parts combined.
Guitar 1 - Pre-Chorus (2nd Chorus)
the following bars (26 to 29) still belongs to the verse, it's only the last part in bar 29 (yellow highlight) that varies. This is a unique riff that only happens before the chorus every time.
Most of these riffs are similar and easy to get wrong, so make sure you look and listen carefully to get it right the first time.
Guitar 1
The chorus is all mainly 5th chords with an occasional 2 fret stretch with your little finger up from the 3rd finger on each 5th chord. This is taken from an old blues rhythm style..
|
A5 |
For the D5th chord shape use the standard 1st finger on the thicker (5th) string and 3rd finger on the (4th) thinner string under it. When you play the note 2 frets higher than the 3rd finger make sure you stretch your 4th finger. Some people play the 5th chord using their 1st & 2nd fingers then stretch with their 4th. I guess it's up to you but I prefer the 1st way.
Place your mouse where it says to see what finger to use for the 5th chord shape. The fingers will stay the same for the C5 & G5.
 |
 |
|


Guitar 2
For the 2nd guitar part you are playing a rhythm similar to the verses except for the 2nd bars in each part (bars 31 & 33). In bar 31 you strum 3 G Major chords, all off beat (on the "&"). Make sure you count it through to help with the timing. The "1 2 3 4" is the beat (quarter note/crotchet), the "&" represents the half beat (eighth note/quaver) and at the end of the bar there is an "a", these represent the 16th note or semi-quaver. Listen to the audio tutor to get the idea.


Solos & Riffs
Riff 1 - Intro
This riff has already been show on the "Intro" page. I placed it here to show all the separate riffs in the song. Start this riff with your 1st finger then place your 3rd finger on the 5th string 9th fret (E) and slide back then up.
Riff 2 - Guitar 1
Listen to Riff 1 Guitar 1 & 2 combined
The three main chords to this song are D, C then G. I like to describe the next riff this way. If you were to play D Major as an A shape bar chord it would be placed on the 5th fret, each one of these riffs are played off the back of that A shape bar chord.

This is the same as above but showing how the riff is comming off the back of the D & C (A Shape Bar Chords)

Riff 2 - Guitar 2
This riff is the same as Riff 2 - Guitar 1 except for the end of every progression (yellow Highlight) there is a natural harmonic played on the 12th fret. On end of bar 19 there are natural harmonics used in conjunction with the tremolo bar.


Riff 3
Listen to Riff 3 combined
This riff happens after the Main Solo over the top of riff 2. Start the first note (4th string 12th fret) with you 1st finger. Bar 76 is played 4th finger 14th fret, 1st finger 10th fret slide up to the 11th then lay your 2nd flat over the two 12's on the 4th & 5th string, then slide that finger back to the 10th fret. Bar 77 used more natural harmonics.

Riff 4
Listen to Riff 4 combined
This riff is placed between the two choruses at the end of the song. Listen to the audio examples to help you with the timing.

1st Lead Break
All solo's on this page are broken down into phrases. These phrases are smaller sections of the solo. Use them to memorise each solo riff by riff. When you place your mouse over the TAB it will reveal the phrasing, when you click that phrase you'll play an audio example of that phrase. You can listen to the entire riff with backing by clicking the "Listen to all the following parts combined" link.
1st Lead Break
Listen to all the following parts combined
This riff is a favorite of mine! it's fast, melodic and challenging. If you are a beginner, then it maybe a little hard for you to get it up to speed. When learning something difficult learn it slow and in time. If you try and start to fast then you'll end up learning mistakes and in the future when you have to correct them it will be twice as difficult.
As far as what fingers to use it is always a case of common sense. For example you wouldn't start this riff with your 1st finger. Mainly because the next note played is below it on the 12th fret. Obviously you would start with either your 3rd or 4th finger. When bending I have a habit of using my 3rd finger, even when I have to stretch over a 4 fret span between a bend and the next note. I have taught this song to lessons and some prefer using their 4th finger on the bends (especially the 1st bend in bar 37).
Tips: Bar 38 (Phrase 2) - Keep it finger correct, lay your 3rd finger flat across the 10th fret to start with and use your 4th finger when it goes up to the 11th.
Tip: Bar 41 (Phrase 5) - In the 5th last note there is a slide from 9th to 10 then back down to the 9th. I prefer to bend the 9th, it makes the phrase flow a little better.

Main Solo
Listen to all the following parts combined
In my personal opinion this solo waffles on towards the end. It doesn't seem to contain enough melody to make it easy to remember. Make sure you use the "Phrasing" method to help you remember each riff. Some solo's you can sing the guitar parts riff by riff (e.g.. Hotel California), this make it easier to remember because it's already in your head and all you have to do is put the melody to the guitar. Throughout this main solo there is a lot of pentatonic scale use, so try to know what scale you're playing in, it does help in the future.
| Phrase | Scale | Starting Fret |
| Phrase 1 | 1st G Major Pentatonic | (open) |
| Phrase 2 | 4th G Major Pentatonic | (7th fret) |
| Phrase 4 to 9 | 1st G Major Pentatonic | (12th fret) |
| Phrase 10 | 2nd G Major Pentatonic | (15th fret) |
| Phrase 11 | 1st G Major Pentatonic | (12th fret) |
Tips: Bars 62 to 64 (Phrase 3) - If you click on the 1st part of the phrase it will play the entire phrase. Then it is broken down into groups (1 to 5). By placing your mouse over each group you can view each individual one and sample the audio. This riff sounds like it goes out of time and it is very difficult, so work with the audio to get it right. It also includes some stretching with your fingers. Here are the suggested finger placement.
- 12th fret (1st finger)
- 14th fret (2nd finger)
- 16th fret (3rd finger)
- 17th fret (4th finger)
Tips: Bar 66 (Phrase 5) - The wiggly line (~~) represents "Vibrato"
| Other Terms | Meaning |
| H.O. | Hammer On |
| P.O. | Pull Off |
| Arrow curving up | Bending |
| Full;1 3/4;1/4 | Amount On Bend |
| Straight Line Up of Down "/" or "\" | Slide To The Next Note |

